
Crystal is dead. Long live Dataviews.
We just completed our upgrade from SyteLine 9.00.20 to SyteLine 9.01.01. For the first time, we managed to complete the entire upgrade ourselves; an exhilarating, terrifying, yet immensely satisfying ordeal. We’ve run into some areas where decisions made by Infor really put some significant pressure on us, but so far most things have been surmountable.


One of those areas that have been challenging is the decision from Infor to drop Crystal Reports support in SyteLine 9.01, to deprecate SSRS, and in the same release introduce Form Reporting and Parameterized Dataviews. Because SSRS is also on its death-bed, it didn’t seem prudent to make the switch from Crystal to SSRS, so we decided to convert the vast majority of our Crystal Reports to Dataviews. The process turned out to not be quite as bad as we originally thought.
Do you really need all of these reports?
When we started our initial research into what was necessary to get up and running, we took a look to find we had roughly 48 Crystal Reports hanging around in our 9.00.20 install. It was eye-opening to cross reference that list to what had actually been run in Background Task History over the past two years. There was also some legwork talking with users to determine what reports were necessary and which ones could be obsoleted. After completing this initial analysis, we were able to knock down the list of reports to exactly half of what we were running before.
Of those reports, the next important question that needs to be asked is “Is this report a good fit for Dataviews?” At Linemaster, we usually draw that line on the question of whether or not the information is consumed internally or externally, and if it has any special formatting requirements. If it has to go to a Customer/Vendor, or if it needs to be printed (1099, anyone?) It has to be a form report. Otherwise, Dataviews are a decent way to display data. (As long as you don’t try to print it. Just… don’t.)
Our Test Subject: “MRP Component Shortage Report”
This was a custom report developed in the early days of SyteLine. We’ve carried it from 8.02 forward, because we’re still not on APS yet. (It’s coming, but change is hard.)
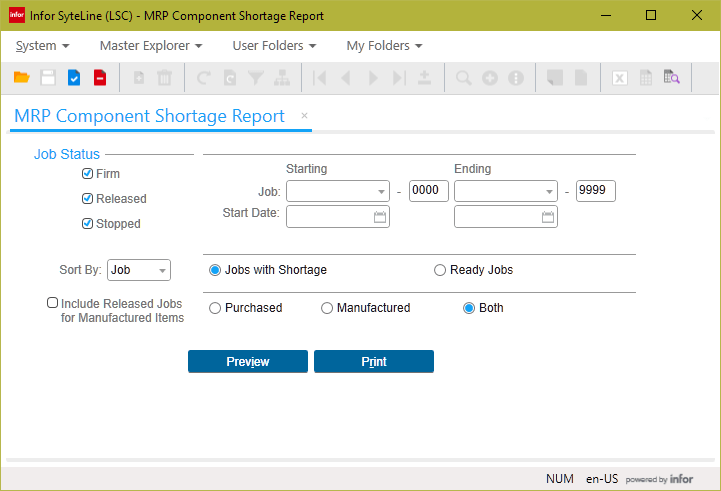
What makes this report especially nice as an example is because it has a calculated column (Shortage), so we’ll get an opportunity to play around with replicating that in Dataviews. Additionally, it has some Stored Procedure tomfoolery that can trip you up if you’re not careful, so we can learn to keep an eye out for that.
The process:
So to summarize the process before we get into it, we’re going to get our Stored Procedure from the Crystal Report, use that to create an empty table, build an IDO over that “scaffold,” Bind the stored procedure to the IDO as a Custom Load Method, build a Dataview over that IDO, format the Layout so it looks nice, and tie the form to the Dataview instead of the Crystal Report… Yeah, it will be a long post.
I will be writing from the view that you are a junior SyteLine developer. I used this process to train a guy who’s been working for Linemaster for only 6 months, and it didn’t take him long before he was an expert. If you’re more experienced, you can probably skim most of the process to figure it out.
Things you’ll need:
- The Crystal Report .rpt file that you intend to convert
- Some way to convert SQL Server Management Studio output to an Insert statement. (I use RedGate, but there are some free alternatives too. This is the only third-party tool you should need.)
- A SyteLine 9.01+ Dev/Test installation, running on an upgraded/FormSynced copy of your SyteLine database, OR a 9.01+ demo installation that you can copy your Stored Procedures and custom forms into.
- An adult beverage, especially if you’re working on this after 7PM.
Step One: Run the report!
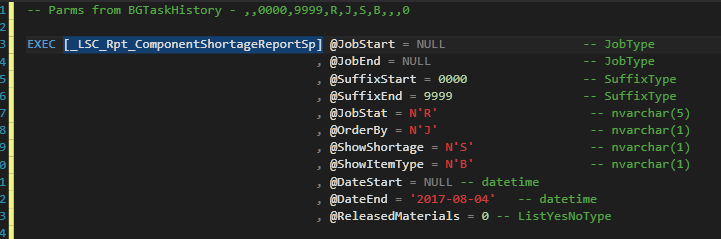
Head into your previous version of SyteLine, find the Report Form that runs the Crystal you want to convert, and run the report. It’s a good idea to discover how the user typically runs the report, so you can replicate their parameter usage. Once the report has run, keep a copy of the output PDF and go look for the task in Background Task History. You will want the Executable name and the parameters that were passed to the report.
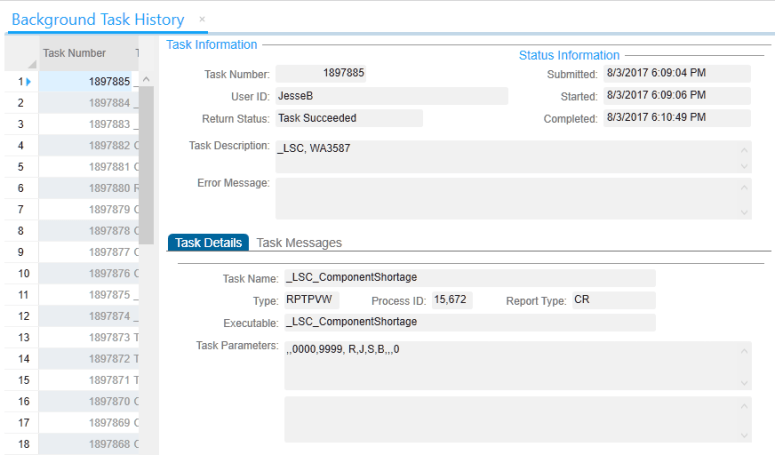
Step Two: What’s my Stored Procedure?
The Executable name in Background Task History is the name of the Crystal Report .rpt file. Navigate to your SyteLine reports directory, and open that Crystal Report file. In the Field Explorer, drill down into Database Fields. You will likely see the stored procedure name there. Don’t be tempted to just use that and move on, you really should verify what the stored procedure actually is. Why? Look at what shows in Field Explorer:
![2017-08-03 19_00_37-Crystal Reports - [MRP Component Shortage Report]](https://sytelinepsa.com/wp-content/uploads/2017/08/2017-08-03-19_00_37-crystal-reports-mrp-component-shortage-report.png?w=775)
Looks pretty cut and dry, right? Not so fast. In this case, the developer actually took an existing Crystal Report and just swapped out the Stored Procedure, without renaming the datasource. (Yeah, sins of the past. Wouldn’t fly in a peer review today.) If you Right Click > Set Datasource Location, it tells a much different story.
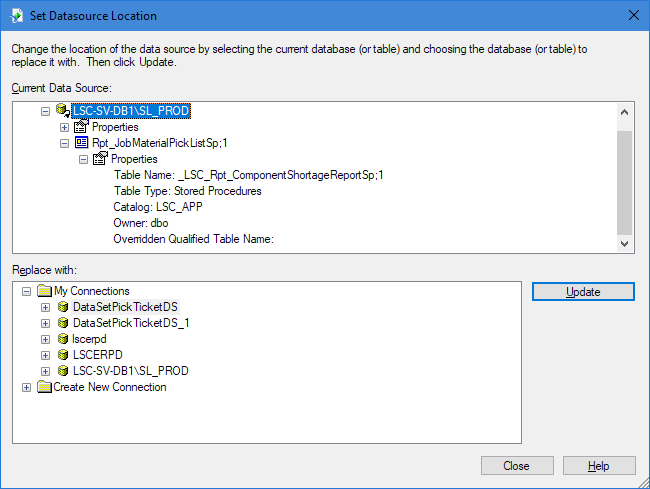
Check that out. The actual stored procedure is _LSC_Rpt_ComponentShortageReportSp.
Gotcha: Watch out for Formula Fields.
While you’re in here, flip through the fields on the report, and take note of anything that starts with @. That is likely a Formula field, which you will need to recreate in the Dataview. RightClick > Edit Formula to get an idea of what the custom field is. That information will be necessary later on.
![2017-08-04 10_43_13-Crystal Reports - [MRP Component Shortage Report].png](https://sytelinepsa.com/wp-content/uploads/2017/08/2017-08-04-10_43_13-crystal-reports-mrp-component-shortage-report.png?w=775)
if {Rpt_JobMaterialPickListSp;1.qty_avail} < ({Rpt_JobMaterialPickListSp;1.qty_required} - {Rpt_JobMaterialPickListSp;1.qty_issued}) then "*" else ""
Step Three: Build the “Scaffolding” Table
In this next step, we will create an empty table that is designed to hold the resultset of the stored procedure. This step effectively creates a skeleton on which we can build the IDO quickly. Open SQL Server Management/Visual Studio, connected to your new Application Database, and run the stored procedure, using the same parameters that you extracted from Background Task History.
The next step requires a third party tool if you want to do it quickly and easily, but you could do this same process by hand if necessary. If you have RedGate SQL Prompt, right click the resultset and “Script as Insert.”
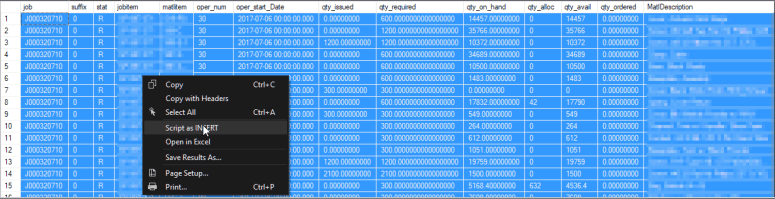
This will open a new tab, with a SQL Script that generates a temp table, complete with properly sized columns, and then fills it with data. We don’t need any of the data, so delete the INSERT statements. We’re left with a simple “Create Table” statement.
There are, of course, other ways to do this, but I find this method to be the fastest. If you don’t want to go this route, you may have some luck with OPENROWSET.
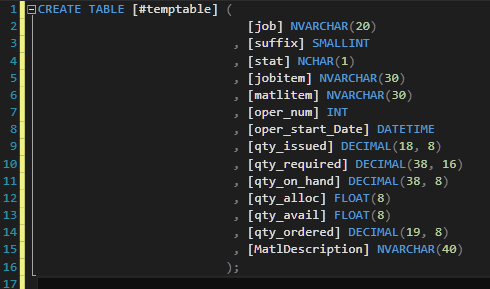
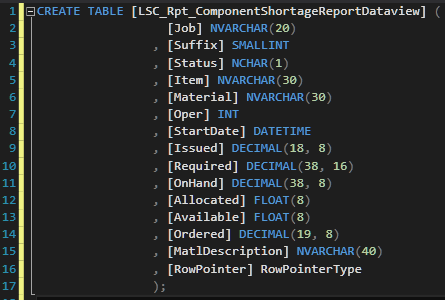
Rename #temptable to an actual table name that conforms with your naming conventions (e.g. LSC_Rpt_ComponentShortageReportDataview). You may also wish to rename columns to something that looks a little cleaner. However, we’re not done yet:
Gotcha: RowPointer is necessary for Dataviews.
You need to add a column called RowPointer (Case Sensitive!!) with a datatype of RowPointerType. (Note, you can do this later in the IDO as an unbound property if you miss this step.) Funnily enough, there doesn’t even need to be RowPointer information in this table or as an output of the Stored Procedure (although that’s a nice thing to have if you can supply it), it just needs to exist.
Go ahead and create the table.
Step Four: Build the IDO
Log into the new SyteLine version, create an IDO project, and click “New IDO.” Bind your new IDO to the table that you just created.
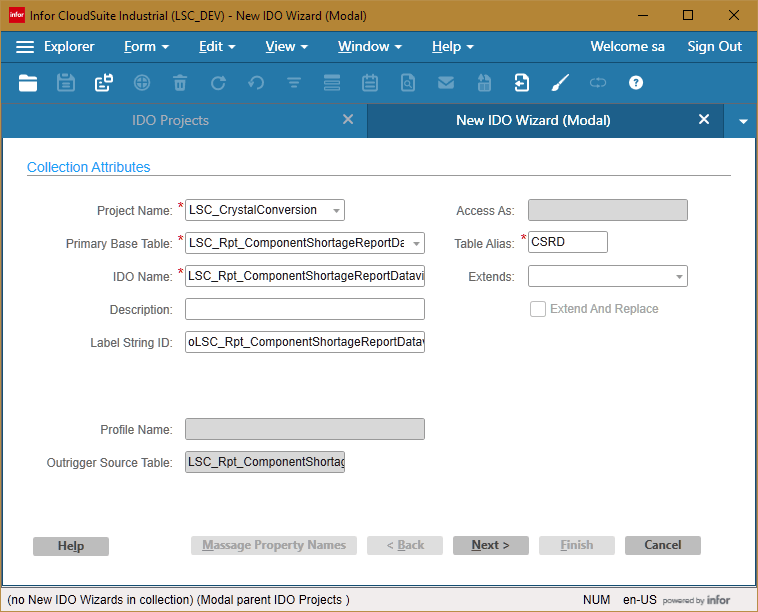
You can massage property names on the next page, if you didn’t do it in SQL.
Click Finish, and you have an IDO! Easy. Now, if you wanted to skip all of that create table nonsense, you could theoretically bind an IDO to another unrelated empty table, and generate all the properties as Unbound properties, but I find this way to be much faster. Also, if you’d like, you can now delete your base table, since you won’t actually be using it for anything.
Step Five: Bind the Stored Procedure to the IDO
Next step is to build a Custom Load Method. Click the New Method button on the IDO form.

Gotcha: Make sure you select “Custom Load Method”
When creating your IDO method, make sure you select “Stored Procedure – Custom Load Method” from the Method Type drop down. A standard method only allows you to return data through Output variables, while a custom load method lets you fill empty properties with data. That’s what we want.
Specify the stored procedure that we identified earlier, and click OK.

When you get back to the IDO form, before you go look at the method, hop onto the Properties tab and copy the Sequence and Property Name columns.
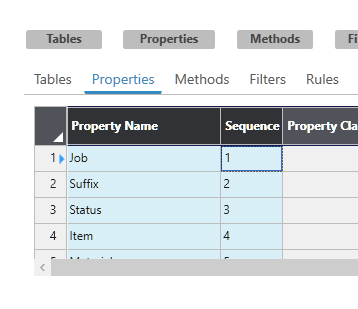
Open the Method, and Paste-Rows-Append them to the Custom Load Method Output Properties grid. Make sure you remove the RowPointer property, since the Stored Procedure isn’t expecting that as an output.

Check in your IDO, and we’re done with the middleware layer!
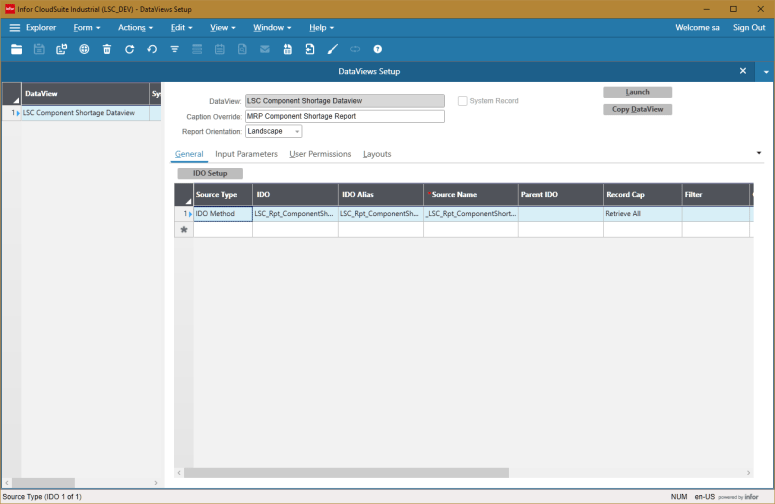
Step Six: Create your Dataview
Add a new record on the Dataviews Setup form. Specify your name and caption, and then add an IDO record below. Change the Source Type to IDO Method, specify your new IDO, and the Custom Load Method you created earlier. Also a good idea is to set your record cap to Retrieve All… Well, I suppose whether or not that is a good idea depends on who’s running the report.
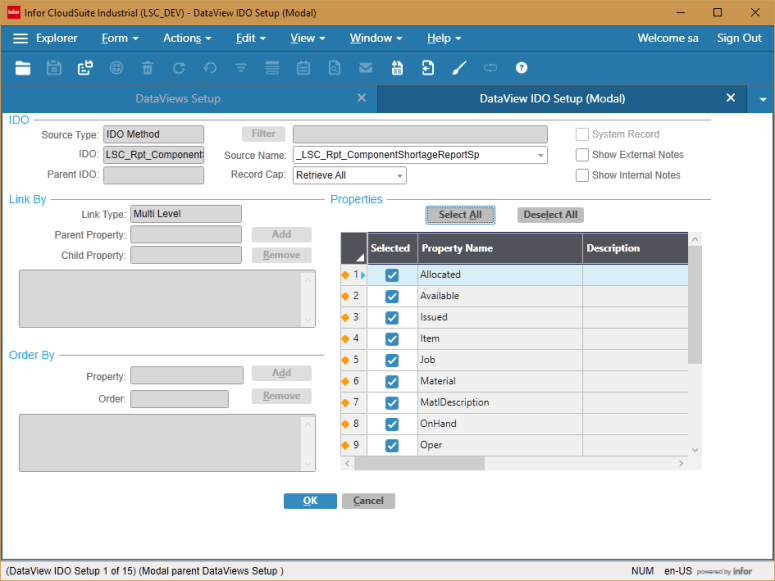
Save and click “IDO Setup.” Here’s where you get to select your properties. In some cases, the Stored Procedure may return more information than you need, so you can be selective here. In our case, Select All and move on. Additionally, if you’re feeling really generous, you can change the property captions to something more human friendly. (Scroll to the right.)
Now we set up the parameters. Just like we copied the Properties into the IDO, we can pull the parameters from the Method that we created earlier. We will just need to drop them into Excel so we can reorder the columns and Paste-Rows-Append them into the Dataview Input Parameters tab.

 - IDO Methods (Linked)")
 - DataViews Setup")
After this, we can actually test our Dataview by clicking Launch! It will ask you to input each of the parameters, which is a little cumbersome, but we will handle that later when we tie this to the report form.
Step Seven: Create your Layout
So now we have data! The output of the stored procedure is completely unformatted, and we don’t have our custom columns, but at least we have a parameterizable dataset that can be accessed by the users. In fact, if we were Infor, we would call ourselves done and ship it. (Too soon?) However, we’re going to make things work a little better for the users. Step one is to reorder and resize the columns, ideally to the same layout as the Crystal Report.
Then, we can create the custom shortage column that we pulled the code for earlier. In DataView speak, that looks like this:
IF( [Available] < [Required] - [Issued], "true", "false" )
What’s great is Dataview formulas are much easier to read than our Crystal formula syntax, and should be immediately familiar to Excel users. Here’s our layout after our changes:
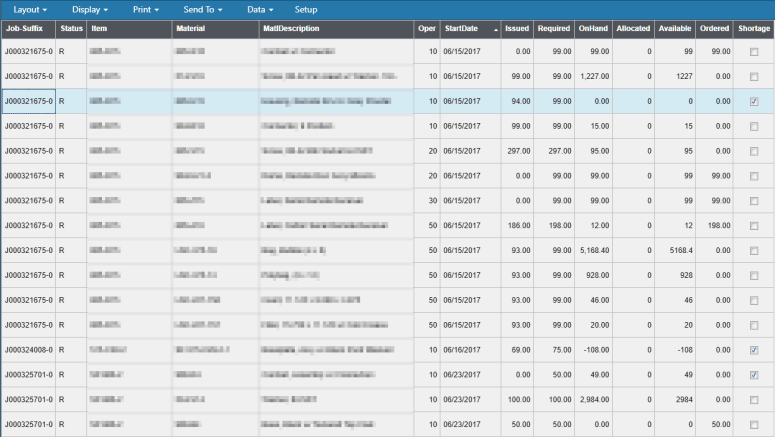
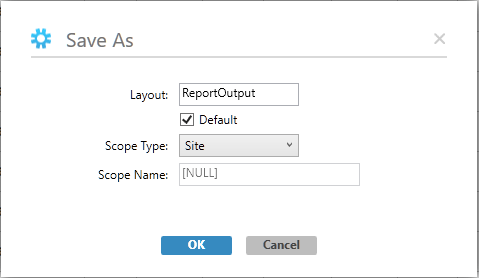
Save your layout as Default, Site, with the name “ReportOutput” (we will need that later.)
Step Eight: Run the DataView from a form
The last step is to take our form and modify it to run the Dataview instead. We’ll take this in two parts, printing with TaskMan and previewing the Dataview.
Printing with TaskMan
This one is really, really easy. Go find the Background Task Definition in 9.01, change report type to DATAVIEW, and change the executable to the following:
Dataview Name-Dataview Layout
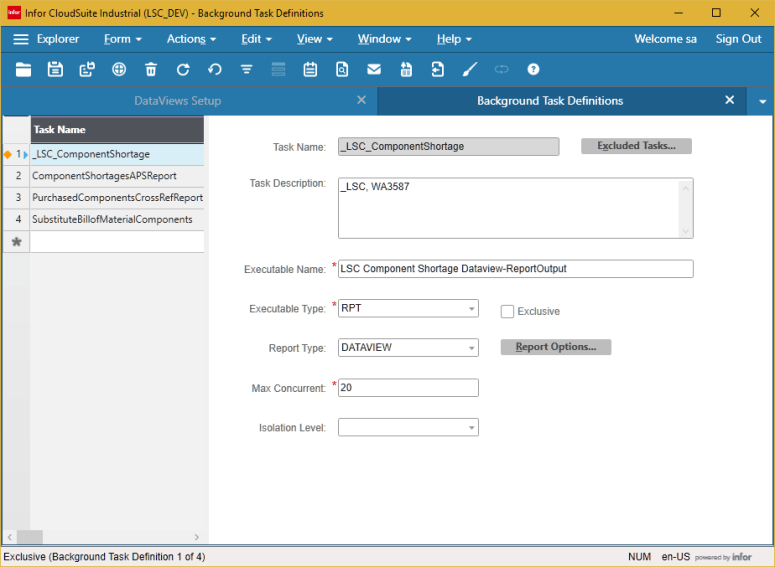
When clicking “Print” on the Report Form, it will now submit the background task as a Dataview instead of the Crystal Report.
Gotcha: TaskMan Dataview Rendering Limitations
Here’s where Dataviews can be a bit depressing. In the current version of 9.01, Custom Columns will not display on the PDF. Also, if your layout is too wide, the columns will fall off the side of the report. You may be forced to change your layout to stack columns on top of each other. Remember what I said earlier about avoiding having to print dataviews? Try to keep your users from doing that. It’s not pretty.
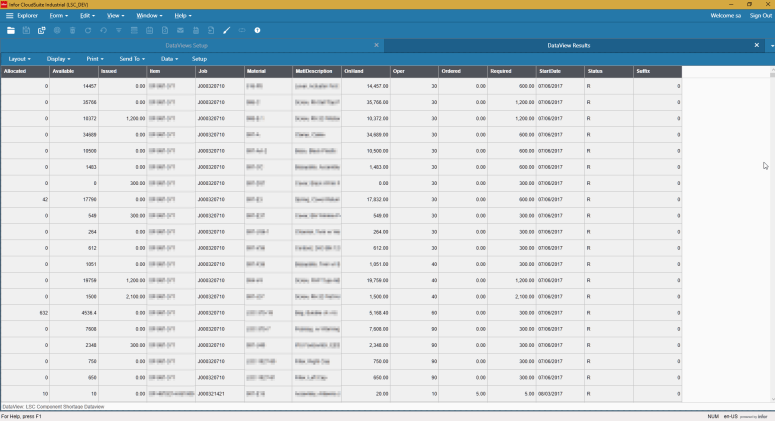
Previewing with DataView Results
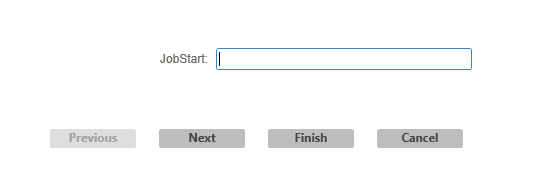
This last step will require some form editing. Your report form will most likely have a Preview button, that launches an event handler. This typically runs the Print Preview event type, passing in V(BGTaskName) and V(BGTaskParms).
Disable that event.
Instead, add a new event, of type Run Form. The Form you want to run is WBDataviewResults, and the rest of the magic happens in the Set Variables screen. You will need to fill in the following variables:
- DataViewName
- InputParameter1
- InputParameter2
- ……..
Specify the Dataview Name, and the parameters in the same order that they were listed in BGTaskParms.

In the end, our Run Form event looks like this:
WBDataViewResults( SETVARVALUES(DataViewName=LSC Component Shortage Dataview, InputParameter1=V(JobStarting), InputParameter2=V(JobEnding), InputParameter3=V(JobSuffixStarting), InputParameter4=V(JobSuffixEnding), InputParameter5=V(JobStatusFirm)V(JobStatusReleased), InputParameter6=V(SortBy), InputParameter7=V(Shortage), InputParameter8=V(ItemType), InputParameter9=V(DateStart), InputParameter10=V(DateEnd), InputParameter11=V(ShowReleased)) )
That should do it!
In Conclusion…
So looking at this process might seem intimidating, especially if you haven’t worked with Custom Load Methods and Dataviews before. However, once you do it once or twice it becomes second nature. When we were doing our conversions for the upgrade, I actually split the workload between two of my team members. One of them took each Crystal Report and turned it into an IDO with a Custom Load Method, while the other created the Dataviews, fixed the layouts, and bound them to forms. We did 24 reports in a week, which is a pretty significant accomplishment.
Hopefully this process makes your upgrade easier.

Thank you for sharing your experience in conversion. We are about to convert 100+ crystal reports ourselves and appreciate the advice.
LikeLike
Thank you for sharing this info.
LikeLiked by 1 person